
What is a Timer Job?
A Timer Job is a periodically executed task inside SharePoint Server. It provides us a task execution environment.
Default Timer Jobs inside SharePoint
There are many timer jobs inside SharePoint which do internal tasks like:
- Send emails
- Validate sites
- Delete unused sites
- Health analysis
- Product versioning
- Diagnostics
These tasks will having execution periods like:
- Minute
- Hour
- Day
- Week
- Month
The purpose of this timer job is to add an item to a list for every 5 min.
There are some prerequisites before proceeding further.
1. The user should have Administrator privileges to deploy the timer job into Central Admin.
2. Create a list with the name “TimerJobList” in the site in which you are going to deploy the solution.
There are some prerequisites before proceeding further.
1. The user should have Administrator privileges to deploy the timer job into Central Admin.
2. Create a list with the name “TimerJobList” in the site in which you are going to deploy the solution.
Please find the steps to create the custom timer job.
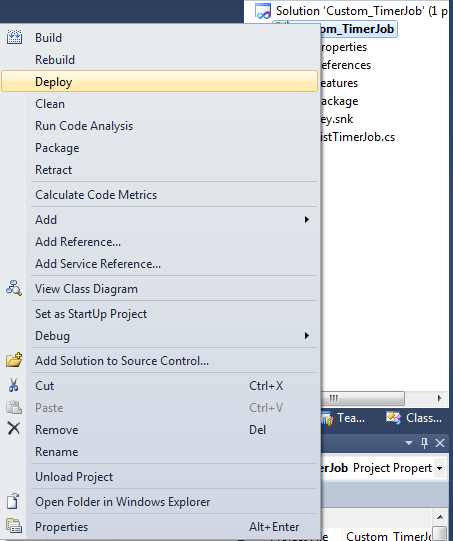
Step 1: Open Visual Studio 2010 >File > New >Project >SharePoint 2010>Empty SharePoint Project. >Name it Custom_TimerJob>Ok
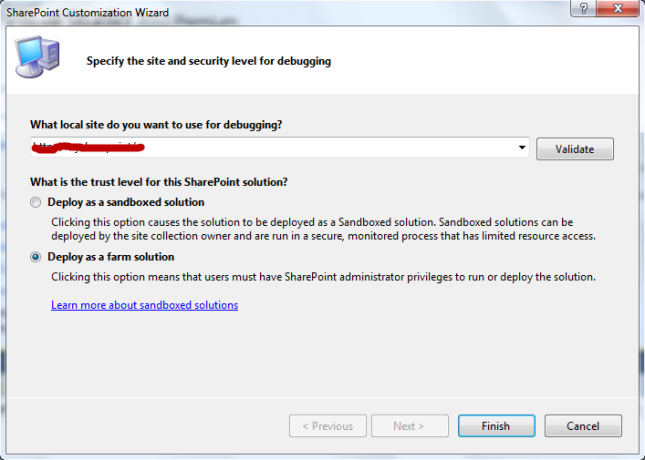
Step 2: Specify the site and security level for debugging
Step 3: Create a class with the name “waiinTimer” that inherits from the “Microsoft.SharePoint.Administration.SPJobDefinition” class. To implement this class, we need to create a few constructors and override the Execute() method as following .

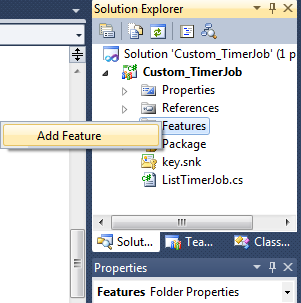
Step 4: Now that you have the job built> Right click on the Features >Add Feature
Right click on the Feature1 ” you can rename the Feature1 to any name” > Add Event Receiver
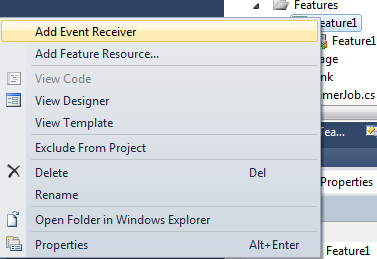
Step 5: the event Receiver class inherits from the “Microsoft.SharePoint.SPFeatureReceiver” and This class handles events raised during feature activation, deactivation as following
using System;
using System.Runtime.InteropServices;
using System.Security.Permissions;
using Microsoft.SharePoint;
using Microsoft.SharePoint.Security;
using Microsoft.SharePoint.Administration;
namespace Custom_TimerJob.Features.Feature1
{
/// <summary>
/// This class handles events raised during feature activation, deactivation, installation, uninstallation, and upgrade.
/// </summary>
/// <remarks>
/// The GUID attached to this class may be used during packaging and should not be modified.
/// </remarks>
[Guid("114e3935-3594-42d5-aa34-1c532b30539a")]
public class Feature1EventReceiver : SPFeatureReceiver
{
const string List_JOB_NAME = “List Timer Job”;
// Uncomment the method below to handle the event raised after a feature has been activated.
public override void FeatureActivated(SPFeatureReceiverProperties properties)
{
SPSite site = properties.Feature.Parent as SPSite;
// make sure the job isn’t already registered
foreach (SPJobDefinition job in site.WebApplication.JobDefinitions)
{
if (job.Name == List_JOB_NAME)
job.Delete();
}
// install the job
List_TimerJob listLoggerJob = new List_TimerJob(List_JOB_NAME, site.WebApplication);
SPMinuteSchedule schedule = new SPMinuteSchedule();
schedule.BeginSecond = 0;
schedule.EndSecond = 59;
schedule.Interval = 5;
listLoggerJob.Schedule = schedule;
listLoggerJob.Update();
}
// Uncomment the method below to handle the event raised before a feature is deactivated.
public override void FeatureDeactivating(SPFeatureReceiverProperties properties)
{
SPSite site = properties.Feature.Parent as SPSite;
// delete the job
foreach (SPJobDefinition job in site.WebApplication.JobDefinitions)
{
if (job.Name == List_JOB_NAME)
job.Delete();
}
}
}
}
Step 6: Before Deploying you should select the scope of the Feature in other words in which scope you will activate the Feature(Farm,Site,Web,WebApplication). In our case we will activate Feature1 on Site which means Site Collection.
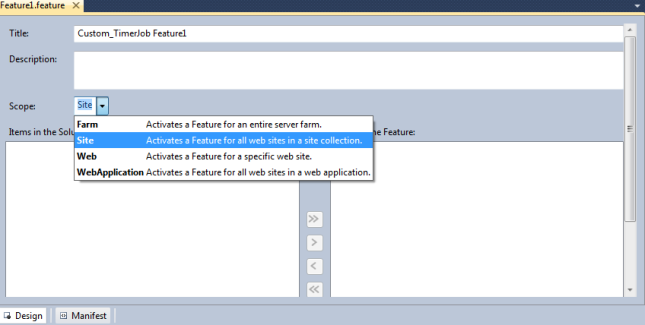
Note:if u r trying to dploy feature with wrong scope they will give u error. Change Scope…

Open now your SharePoint site and select ListTimerJob List and you should see something similar to the following image
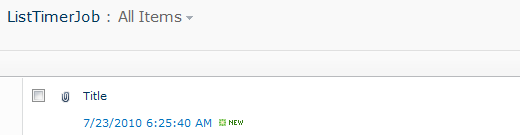
Our custom timer job is working fine now you can go and check it and modify the schedule as following
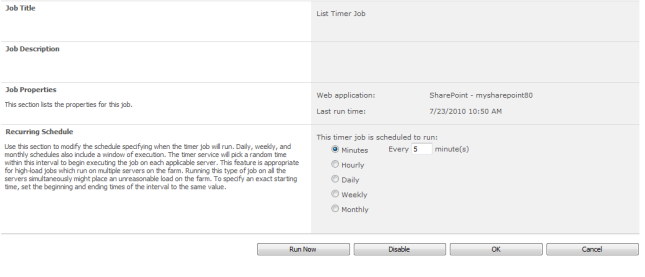
Go to SharePoint 2010 central administration >Monitoring >in the Timer Jobs Section Select Review Job Definitions
and you should See our Custom Timer Job

Click on it and you should see Edit Timer Job Page ,Modify Timer Job schedule based on your requirement
In this article we have explored the Timer Job feature of SharePoint and creating a custom timer job. Following are the key points to be remembered:
- Timer Jobs can be scheduled for automating jobs inside SharePoint 2010
SPJobDefinitionis the base class for Timer Job- Create Event Receiver Feature to create or delete the timer job
SPFeatureReceiveris the base class for the event receiver- The feature gets deployed in the 14hive folder
- OWSTIMER.EXE is the process executing Timer Jobs
Note : you can also modify schedule of your custom Timer Job from the code but you need to add one of the following class in FeatureActviated Event Handler as following
After Specific Minutes use SPMinuteSchedule class
Hourly use SPHourlySchedule class
Daily use SPDailySchedule class
Weekly use SPWeeklySchedule class
Monthly use SPMonthlySchedule class
What is the difference between stsadm and powershell?
In SharePoint 2007 administration commands were executed by command utility called STSADM. In 2007 version of MOSS PowerShell was not integrated into the SharePoint platform.
In SharePoint 2010 PowerShell is largely integrated. STSADM is still supported but mainly for backward compatibility.
In SharePoint 2010 PowerShell is largely integrated. STSADM is still supported but mainly for backward compatibility.
PowerShell:
The Windows PowerShell Integrated Scripting Environment offers a lot of debugging possibilities like setting breakpoints, step by step debugging, etc. If you’re working with Visual Studio, these debugging possibilities are very useful.PowerShell is Microsoft’s next-generation scripting language offering direct access to .NET objects, complex flow and structure capabilities.
SharePoint 2010 Management Shell is just a PowerShell instance that loads the sharepoint.ps1 script file.
STSADM is still present in SharePoint 2010, but its prominence has been greatly reduced as it is extremely limited. Using STSADM, Conditional logic was difficult to achieve using batch files. If no command was available to manipulate a setting, a custom command would have to be created. And performance was poor because of the inability to re-use objects across command calls.
STSADM Commands
1) To add solution to the Farm:
stsadm –o addsolution –filename “C:\Deployment\MySharePointSolutionPackage.wsp”
2) To deploy the solution
stsadm –o deploysolution –name MySharePointSolutionPackage.wsp –url http://webapplication/ –allowgacdeployment –immediate
3) To upgrade a solution
stsadm –o upgradesolution –name MySharePointSolutionPackage.wsp –filename “C:\Deployment\MySharePointSolutionPackage.wsp” –immediate
4) To retract and remove a solution:
stsadm –o retractsolution –name MySharePointSolutionPackage.wsp –url http://webapplication/ –immediate
stsadm –o deletesolution –name MySharePointSolutionPackage.wsp
stsadm –o deletesolution –name MySharePointSolutionPackage.wsp
Powershell Solution Cmdlets
1) To add solution to the Farm:
Add-SPSolution –LiteralPath “C:\Deployment\MySharePointSolutionPackage.wsp”
To add a Sandboxed solution(adding to the site collection)
Add-SPUserSolution –LiteralPath “C:\Deployment\MySharePointSolutionPackage.wsp” –Sitehttp://webapplication/sitecollection
2) To install ( deploy in stsadm) a Farm Solution:
Install-SPSolution –Identity MySharePointSolutionPackage.wsp –WebApplication http://webapplication/ –GACDeployment
To install ( deploy in stsadm) a Sandboxed Solution (installing to the site collection):
Install-SPUserSolution –Identity MySharePointSolutionPackage.wsp –Site http://webapplication/sitecollection
3) To update (upgrade in stsadm) a Farm solution :
Update-SPSolution –Identity MySharePointSolution.wsp –LiteralPath “C:\Deployment\MySharePointSolutionPackage.wsp” –GacDeployment
To update (upgrade in stsadm) a Sandbox solution (updating to the site collection) :
Update-SPUserSolution –Identity MySharePointSolution.wsp –Site http://webapplication/site –ToSolutionMySharePointSolutionPackage.wsp
4) To uninstall and remove FARM level solutions :
Uninstall-SPSolution –Identity MySharePointSolution.wsp –WebApplication http://webapplication/
Remove-SPSolution –Identity MySharePointSolution.wsp
To uninstall and remove Sandbox solutions (uninstall and remove from the site collection):
Uninstall-SPUserSolution –Identity MySharePointSolution.wsp –Site http://webapplication/sitecollection
Remove-SPUserSolution –Identity MySharePointSolution.wsp –Site http://webapplication/sitecollection
how to lookup “person or Group” field from other list
- Create custom list called list1
- Create custom list called list2
- In list1 create text column called text
- In list1 create person column called person
- In list1 create text column called 4th
- In list1 create a workflow using sharepoint designer
- In workflow which i called WF1, there are no conditions and only one action. The workflow is set to run when a new item is created
- Workflow action is: Set [field value] to be [field value]Set 4th (Text column) to be Person (Display Name of Person Column)
- Add an item into list1
- In list2 create a lookup column called lookup, point it to list1 and the 4th column
- In list2 create a new item, the lookup is working.


Leave a comment
Posted by Siddheshwar Kohale on November 15, 2013 in SharePoint Interview Questions, SP Interview
Refer Scripts and CSS Style Sheet in SharePoint 2013 Visual Web Part and Master Page
1.Referring Java Script in Master Page
<SharePoint:ScriptLink ID=”ScriptLink1″ Name=”~SiteCollection/Style Library/Scripts/sitecol-master.js” runat=”server” />
<SharePoint:ScriptLink ID=”ScriptLink2″ Name=”~Site/Style Library/Scripts/site-master.js” runat=”server” />
2.Referring CSS Style via CssRegistration Control ( Applicable only for Form Solutions)
<SharePoint:CssRegistration ID=”CssRegistration1″ Name=”/_layouts/15/SFS.Ashok.Refer/Styles/site-visualwp.css” runat=”server” After=”corev15.css” />
Difference between event receivers and workflows?
- Unlike Workflows, Event Receivers cannot be triggered manually. SharePoint event handlers run for a short period of time (generally seconds), while SharePoint workflows may run for a much longer time period (days, months, or even years).
- Workflows run asynchronously means we can trigger the workflows only when an item is created and when an item is modified but event receivers can work either synchronously and asynchronously.
- Workflows can start manually but Event Receivers cannot.
- Can cancel the operation in Workflows but in SharePoint 2010 we can cancel the event receivers also.
- We can create workflows either by using SharePoint designer or visual studio but we should create an event receivers using visual studio only.
- SharePoint event handlers are automatically initiated, while SharePoint workflows can be initiated either automatically or manually.
- There is no User Interface(UI) for the event receivers.
Classic Mode Vs Claims Based Authentication in SharePoint 2010
Classic Mode: This is nothing but Windows Authentication. If any web application is created with Classic Mode Authentication then it cannot applicable to configure forms based authentication. But, to configure this application to use Forms Based Authentication then you can convert from Classic Mode to Claims Based. But, there is no UI exist for doing this conversion. The only way around is through PowerShell.
$app = get-spwebapplication “URL”
$app.useclaimsauthentication = “True”
$app.Update()
But, if an application is created using Claims based and if you want to convert from Claims based to Classic Mode then it is not possible either through UI or through PowerShell. So, remember this.
Claims Based: In SharePoint 2010 for a web application we can enable both windows, forms authentication. In earlier implementation to do this, we have to create two web applications which has different zones and different authentication. But, with the new claims based authentication a single application can have the capability to configure both windows and forms under single URL. All this is possible because of the authentication framework is built on Microsoft Identify Foundation. And it uses “Geneva” framework to handle this authentication.


No comments:
Post a Comment